DIY Doom Index – How it’s made!

DIY Doom index is a project I made while at The Flatiron School’s web development immersive. DIY Doom Index allows users to sift through daily political, economic and environmental datasets to build a personalized Doom index. Similar to how the S&P 500 or Dow Jones stock indices aggregate multiple companies’ stock performance into one number, DIY doom index aggregates a number of different “pro-doom” and “anti-doom” metrics into one over-all doom number. Users build a single index that tells them how much better or worse the world is everyday based on their political, economic, and environmental sensitivities. You can use the app here (It’s hosted for free on Heroku and may take a few mins to load, try refreshing if you get an error). The code is on my GitHub and I made a video demo you can checkout. In this series of posts I’m going to go over how I made DIY doom index and suggest some areas for improvement. In this post I’m going to cover how I calculated the index to give each user a personalized experience.

Calculating the index

All of the API calls and index calculations happen in the Ruby on Rails backend. This helps avoid CORS related errors and allows me to quickly load updates as the user adjust their doom preferences.

Model

My ActiveRecord / Postgres model was comprised of Users, User-datasets (a join class), and Datasets.

Users (diy_doomsday_backend/app/models/user.rb):

class User < ApplicationRecord

  # Adds methods to set and authenticate against a Bcrypt password
  # requires "password_digest" in user schema/migration
  has_secure_password

  # sets up relationships
  has_many :user_datasets
  has_many :datasets, through: :user_datasets

  #!!!  add additonal validation

end

This class is fairly simple, it sets up the relationships the other database tables and invokes has_secure_password which utilizes the bcrypt gem and allows my backend to store user authentication details without saving plain text passwords to my database (more on authentication later).  The other classes are even simpler. I just set up the relationships and didn’t do any real validation in the backend. This is certainly an area where the app could be improved. When building the front end, I structured the various requests and forms to validate most of the data before sending it to the backend. These classes could be reworked to make the API more resilient, secure and usable with other front end apps.

User-Datasets (diy_doomsday_backend/app/models/user_dataset.rb):

class UserDataset < ApplicationRecord

  # sets up relationships
  has_many :users
  has_many :datasets
end

Datasets (diy_doomsday_backend/app/models/dataset.rb):

class Dataset < ApplicationRecord

  # sets up relationships
  has_many :user_datasets
  has_many :users, through: :user_datasets

end

Read More

Machine Learning with Tensorflow.js pt.2

A few weeks ago I got started with Tensorflow and covered Tensors and operations. This week I’m going to continue to cover the basic building blocks of Tensorflow and then go over an interactive example that incorporates these elements.

Tensors – These are basically shaped collections of numbers. They can be multi-dimensional (array of arrays) or a single value. Tensors are all immutable which means they cant be changed once created and require manual disposal to avoid memory leaks in your application.

// 2x3 Tensor
const shape = [2, 3]; // 2 rows, 3 columns
const a = tf.tensor([1.0, 2.0, 3.0, 10.0, 20.0, 30.0], shape);
a.print(); // print Tensor values
// Output: [[1 , 2 , 3 ],
// [10, 20, 30]]

const c = tf.tensor2d([[1.0, 2.0, 3.0], [10.0, 20.0, 30.0]]);
c.print();
// Output: [[1 , 2 , 3 ],
// [10, 20, 30]]

Operations – An operation is just a mathematical function that can be used on a tensor. These include multiplication, addition, and subtraction.

const d = tf.tensor2d([[1.0, 2.0], [3.0, 4.0]]);
const d_squared = d.square();
d_squared.print();
// Output: [[1, 4 ],
// [9, 16]]


Models & Layers –  A model is a function that performs some set of operations on tensors to produce a desired output. These can be constructed using plain operations but there are also a lot of built in models with Tensorflow,js that rely on established learning and statistical methods.

// Define function
function predict(input) {
// y = a * x ^ 2 + b * x + c
// More on tf.tidy in the next section
return tf.tidy(() => {
const x = tf.scalar(input);

const ax2 = a.mul(x.square());
const bx = b.mul(x);
const y = ax2.add(bx).add(c);

return y;
});
}

// Define constants: y = 2x^2 + 4x + 8
const a = tf.scalar(2);
const b = tf.scalar(4);
const c = tf.scalar(8);

// Predict output for input of 2
const result = predict(2);
result.print() // Output: 24


Memory Management – Tensorflow.js uses the GPU on your computer to handle most of the operations which means that typical garbage collection isn’t available. Tensorflow therefore includes the tidy and dispose methods that allow you to dump unused tensors out of memory

// tf.tidy takes a function to tidy up after
const average = tf.tidy(() => {
// tf.tidy will clean up all the GPU memory used by tensors inside
// this function, other than the tensor that is returned.
//
// Even in a short sequence of operations like the one below, a number
// of intermediate tensors get created. So it is a good practice to
// put your math ops in a tidy!
const y = tf.tensor1d([1.0, 2.0, 3.0, 4.0]);
const z = tf.ones([4]);
return y.sub(z).square().mean();
});
average.print() // Output: 3.5

Read More

Machine learning in the browser with Tensorflow.js pt.1

In my previous blog post I discussed perceptrons, a very early example of machine learning. As a recap, perceptrons are simple learning algorithms that can solve linearly separable problems.

Two lines demonstrate the correct and predicted classification of each point on a grid
Perceptron solving a linearly separable problem (source: nature of code)

This is cool,  but not very useful. As far as I can tell most of the problems a perceptron can solve can be done much more quickly by passing your data through a well considered IF statement (I.e. If coffee mug is in photo then it is a photo of coffee). These days we can see all sorts of applications of machine learning that seem to solve much more complicated problems. Self driving cars are learning what a person looks like, can make assumptions about how they’ll move and can direct a car to respond based on this information. Much of this more advanced machine learning is through multilayer perceptrons, neural nets and other advanced methods.

Single layer perceptron (nature of code)
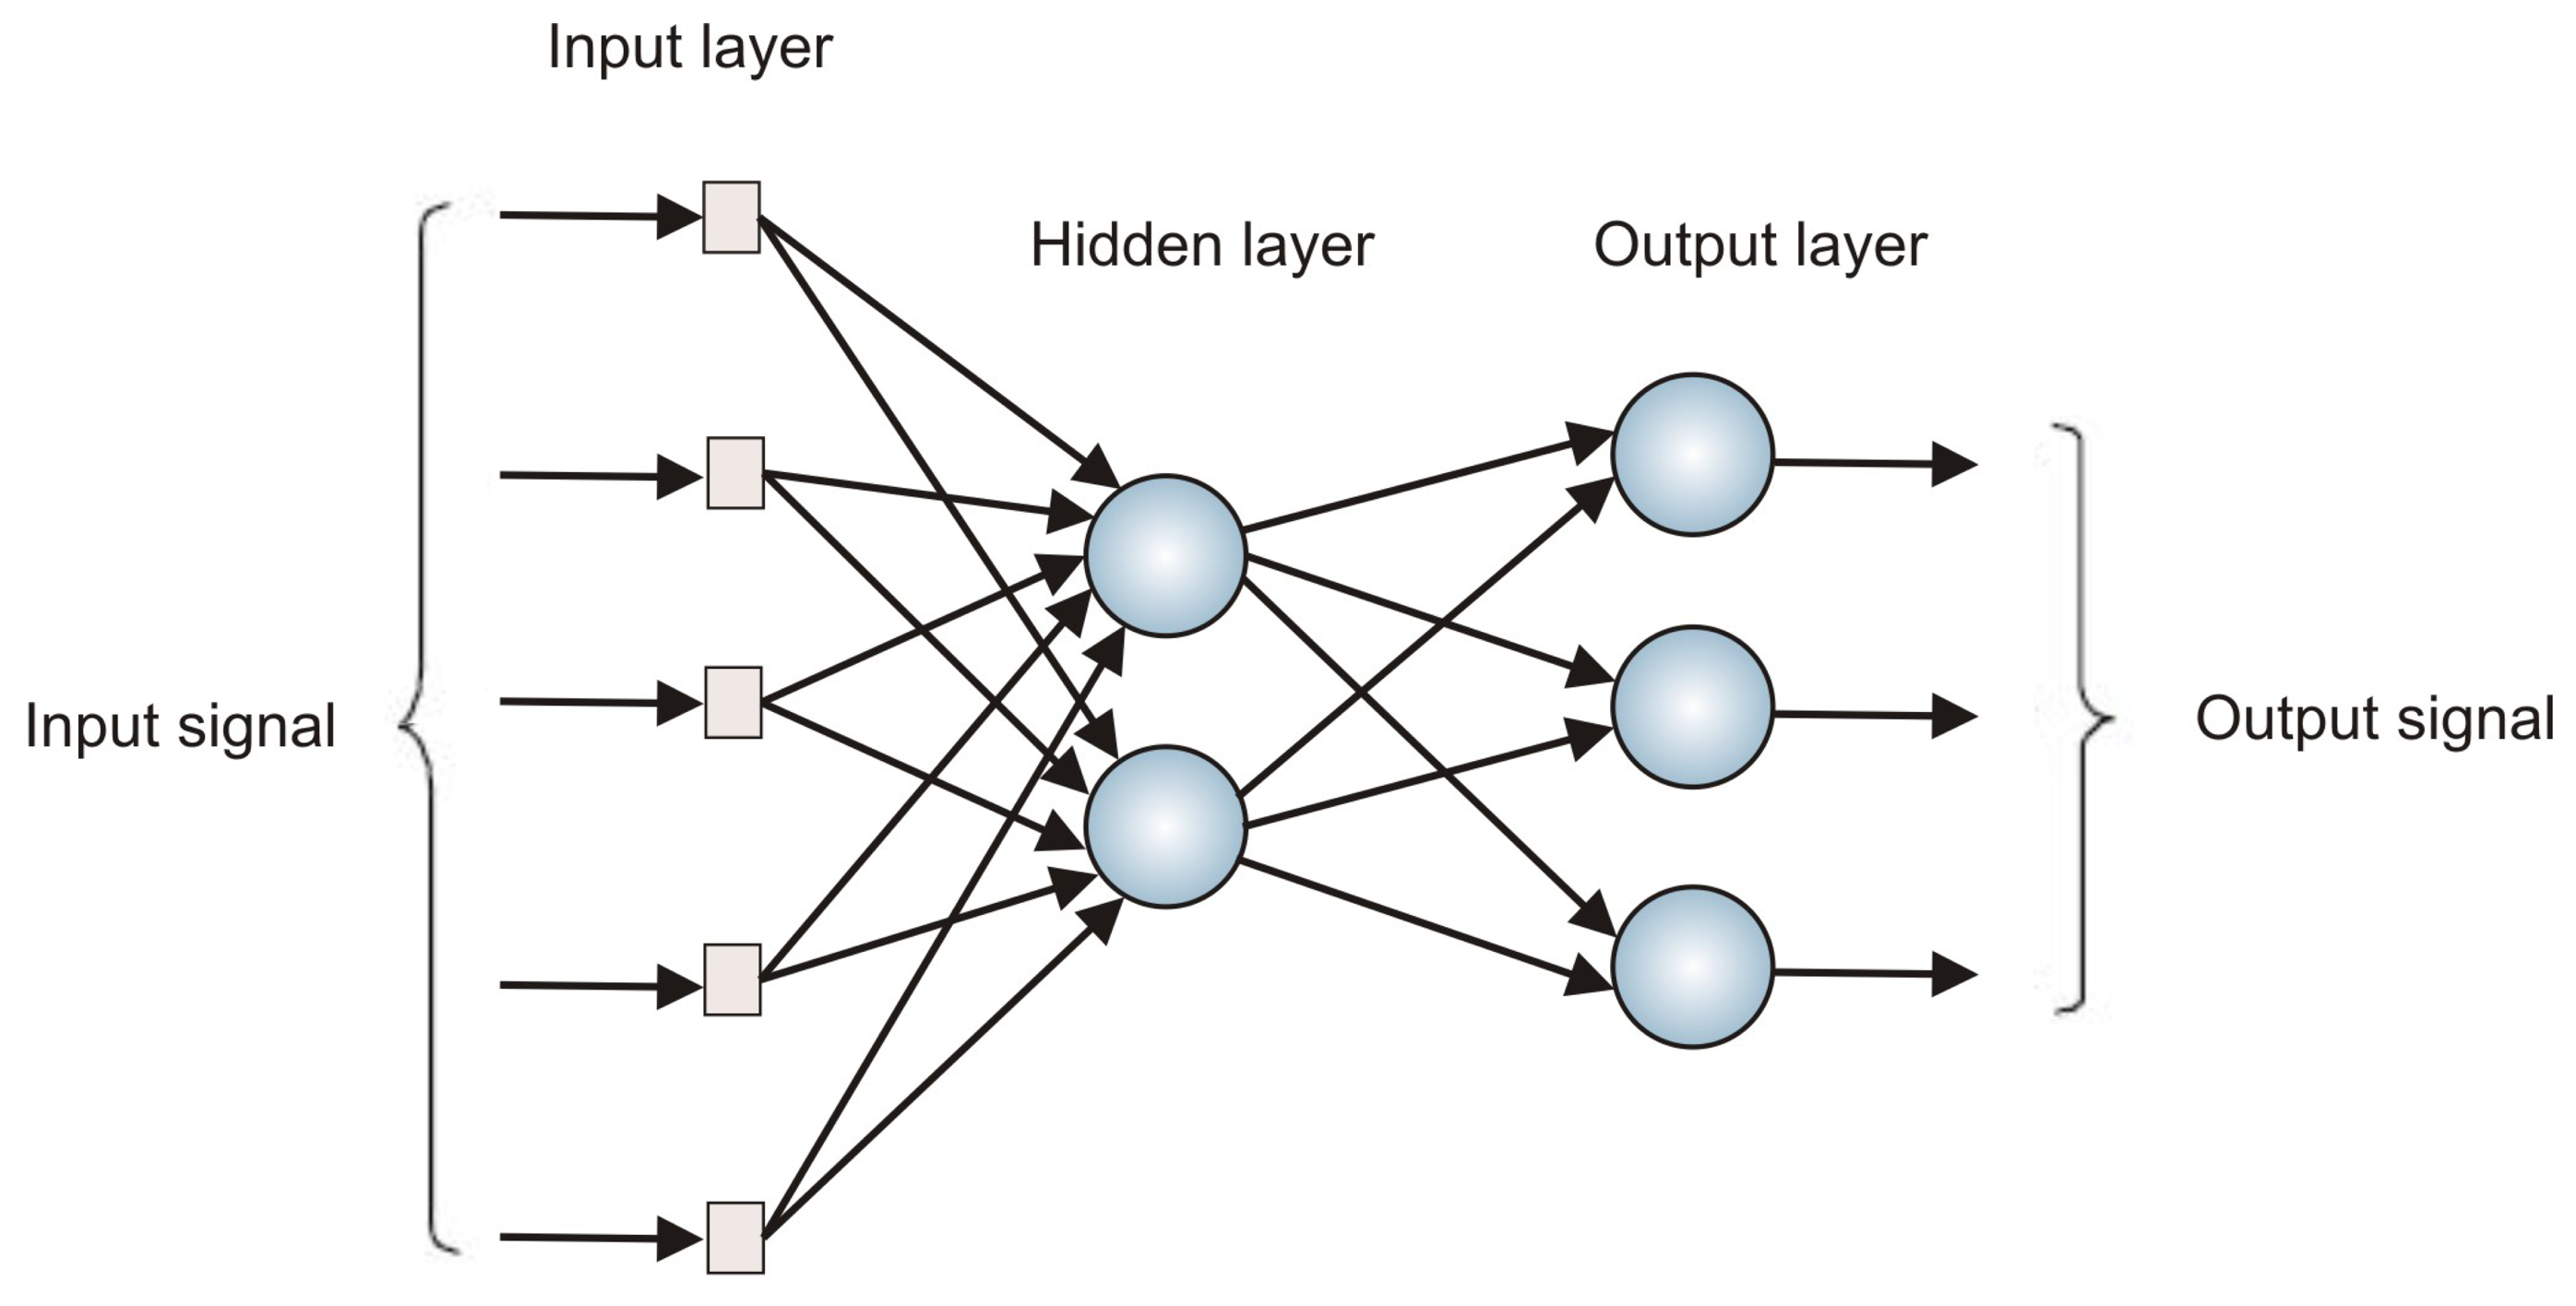
Multi-layer perceptron
Example of complex Non-linearly seperable data

One of the best way to get started working with these advance machine learning algorithms is through Google’s tensorflow library. This has been available as a python library for some time and was recently updated to include a Javascript library as well. In this post I’m going to cover how to quickly get this running and some basic concepts that you need to understand as you get started. Much of this material is covered in the getting started section on the tensorflow.js website as well.

Read More

Machine Learning, Perceptrons and Ruby

Machine learning(ML) refers to a collection of programming techniques that allow computers to make distinctions or recognize patterns without explicit commands. This field is based on statistical methods and emerged from artificial intelligence research in the late 1950s and early 1960s. Applications of ML include optical character recognition, sentiment analysis, computer vision and prediction making. People with experience in ML are highly desired in the job market and learning based algorithms are making more and more important decisions in our society. So as an emerging programer its probably worth while to learn a bit about how machines learn.

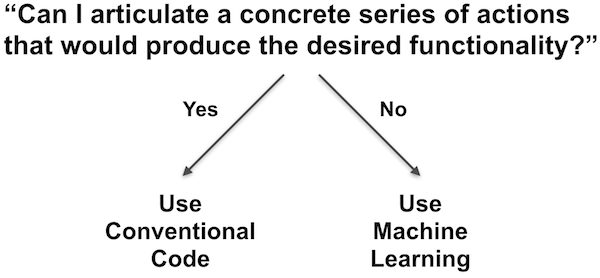
Use conventional code if you can articulate a concrete series of actions that would produce the desired functionality.
Should I use Machine Learning? (Source: Learning Machines)


As an introduction to ML this post will walk through how to build a single layer perceptron in Ruby. The perceptron was one of the first functional ML algorithms. It was developed by Frank Rosenblatt in 1957 and was used to build a machine that could identify certain objects. At the time Rosenblatt stated that the “perceptron [is] “the embryo of an electronic computer that [the Navy] expects will be able to walk, talk, see, write, reproduce itself and be conscious of its existence.”

I am far from an expert in this field but luckily perceptrons are relatively straight forward models to build. I have seen them written in python, Java, and javascript but had a hard time finding a ruby version. Attempting to build this out in ruby seemed like a decent contribution that I could make.

Using a common biological analogy, a perceptron is like a single neuron in a larger brain. It is designed to take in inputs and based on those inputs generate an output for other neurons.


Diagram of a neuron
Neurons (Source: Nature of Code)


A diagram of a single layer perceptron
Perceptron (Source: Nature of Code)
A diagram that illustrates how a perceptron can be useful
Example use case (Source: Learning Machines)

Read More

Eat Your Feelings DB CLI

Eat Your Feelings DB (EYF) is a simple command line project that Edward N, and I developed for our Module One final project at the Flatiron school in 2018. EYF accesses restaurant reviews via the Google places API and associates each review with an emotional analysis from Parallel Dots. We built an OO model and active record database to select for restaurants and reviewers based on the emotional content of their respective reviews.

This app can be forked on GitHub and cloned to a local machine. To re-seed the database drop the existing tables and re-migrate. Enter Parallel Dots and Google Places API keys in the appropriate spots in the db/seeds.rb file. If you’d like to analyze different restaurants replace the strings in the “Places” array with alternative Google Place IDs. Once you have done this run “bundle install” then “rake db:seed” in terminal and it should populate your database with reviews and emotional analysis. Then you should be able to enter “Ruby bin/run.rb” in terminal and launch our application. Enter “all restaurants” to confirm the data was properly entered.

We would value any contributions in areas of user interface, automatically selecting / adding new restaurants, and performing more analytical operations on the dataset.

Process:
We ran into a few interesting things while working on this project. First we spent a while looking through different APIs and the values that they returned to find what would fit our concept the best. Originally we envisioned using Yelp and IBM Watson but both APIs proved too restrictive and too generalized. Parallel Dots and Google Places on the other hand worked very well with some minor restrictions, mainly Google Places limits each query to 4 reviews which was fine for our purposes but may limit more rigorous analysis.

Another API related challenge we are still working on is how to manage API keys while regularly pushing to GitHub. We ultimately had to reset our API keys after accidentally making them public. Attempts to undo this were frustrating and we still have a lot to learn about protecting credentials like this. [Update: We learned how to use gitignore!]

Lastly, building the interface and having a good framework for what our methods should be returning was a recurring issue. In some cases we wanted the object methods “puts-ing” text to the screen other times we wanted a second helper method to format the output for the user. It was hard to figure out how to make this consistent and what our data types should be. There is probably a lot of room for improvement here too. Ultimately we are happy with our final product and think that EYF represents a great proof of concept for how machine learning and sentiment analysis can be applied.