Blockchain & Crypto. I have been reading about it, buying, selling, and mining it for a few years. Lately my interest in this technology has waned and I’d like to share some of my thoughts about why.
Blog
Basic Bash
In this post I wanted to go over some basic Bash Scripting. Once you know the basics of bash for navigating file systems and executing commands learning how to write basic scripts can be helpful as well. For instance with bash scripting you can regularly move files from one system to another, rename a large number of files and folders, or perform a certain set of operations every time a system boots up. I’ll cover Variables, If statements, and Loops.
Getting started:
Using your Bash terminal find a nice directory to work in and enter the command touch myBashScript.sh
This will create a file with the conventional .sh file extension. Open this file up in your favorite editor and add #!/bin/bash on the very first line. This is called a shebang and it describes the interpreter that we’re going to use (in this case bash). Keep in mind that octothorps(#) can be used to write comments in your code.

Lets add a simple command to test this out. I’m gonna try this echo Greetings Planet.

Now save your file, go back to the command line and type ./myBashScript.sh. You will probably get a permissions related error. By default this file is not executable for security reasons. You can change this by using the chmod command which can modify permissions. Try this chmod 755 myBashScript.sh. Now you should be able to run ./myBashScript.sh and get the expected results.
DIY Doom Index – How it’s made!
DIY Doom index is a project I made while at The Flatiron School’s web development immersive. DIY Doom Index allows users to sift through daily political, economic and environmental datasets to build a personalized Doom index. Similar to how the S&P 500 or Dow Jones stock indices aggregate multiple companies’ stock performance into one number, DIY doom index aggregates a number of different “pro-doom” and “anti-doom” metrics into one over-all doom number. Users build a single index that tells them how much better or worse the world is everyday based on their political, economic, and environmental sensitivities. You can use the app here (It’s hosted for free on Heroku and may take a few mins to load, try refreshing if you get an error). The code is on my GitHub and I made a video demo you can checkout. In this series of posts I’m going to go over how I made DIY doom index and suggest some areas for improvement. In this post I’m going to cover how I calculated the index to give each user a personalized experience.
Calculating the index
All of the API calls and index calculations happen in the Ruby on Rails backend. This helps avoid CORS related errors and allows me to quickly load updates as the user adjust their doom preferences.
Model
My ActiveRecord / Postgres model was comprised of Users, User-datasets (a join class), and Datasets.
Users (diy_doomsday_backend/app/models/user.rb):
class User < ApplicationRecord

  # Adds methods to set and authenticate against a Bcrypt password
  # requires "password_digest" in user schema/migration
  has_secure_password

  # sets up relationships
  has_many :user_datasets
  has_many :datasets, through: :user_datasets

  #!!!  add additonal validation

end
This class is fairly simple, it sets up the relationships the other database tables and invokes has_secure_password which utilizes the bcrypt gem and allows my backend to store user authentication details without saving plain text passwords to my database (more on authentication later). The other classes are even simpler. I just set up the relationships and didn’t do any real validation in the backend. This is certainly an area where the app could be improved. When building the front end, I structured the various requests and forms to validate most of the data before sending it to the backend. These classes could be reworked to make the API more resilient, secure and usable with other front end apps.
User-Datasets (diy_doomsday_backend/app/models/user_dataset.rb):
class UserDataset < ApplicationRecord

  # sets up relationships
  has_many :users
  has_many :datasets
end
Datasets (diy_doomsday_backend/app/models/dataset.rb):
class Dataset < ApplicationRecord

  # sets up relationships
  has_many :user_datasets
  has_many :users, through: :user_datasets

endMachine Learning with Tensorflow.js pt.2

A few weeks ago I got started with Tensorflow and covered Tensors and operations. This week I’m going to continue to cover the basic building blocks of Tensorflow and then go over an interactive example that incorporates these elements.
Tensors – These are basically shaped collections of numbers. They can be multi-dimensional (array of arrays) or a single value. Tensors are all immutable which means they cant be changed once created and require manual disposal to avoid memory leaks in your application.
// 2x3 Tensor

const shape = [2, 3]; // 2 rows, 3 columns

const a = tf.tensor([1.0, 2.0, 3.0, 10.0, 20.0, 30.0], shape);

a.print(); // print Tensor values

// Output: [[1 , 2 , 3 ],

// [10, 20, 30]]
const c = tf.tensor2d([[1.0, 2.0, 3.0], [10.0, 20.0, 30.0]]);

c.print();

// Output: [[1 , 2 , 3 ],

//          [10, 20, 30]]
Operations – An operation is just a mathematical function that can be used on a tensor. These include multiplication, addition, and subtraction.
const d = tf.tensor2d([[1.0, 2.0], [3.0, 4.0]]);

const d_squared = d.square();

d_squared.print();

// Output: [[1, 4 ],

//          [9, 16]]
Models & Layers – A model is a function that performs some set of operations on tensors to produce a desired output. These can be constructed using plain operations but there are also a lot of built in models with Tensorflow,js that rely on established learning and statistical methods.
// Define function

function predict(input) {

// y = a * x ^ 2 + b * x + c

// More on tf.tidy in the next section

return tf.tidy(() => {

const x = tf.scalar(input);
const ax2 = a.mul(x.square());

const bx = b.mul(x);

const y = ax2.add(bx).add(c);
return y;

});

}
// Define constants: y = 2x^2 + 4x + 8

const a = tf.scalar(2);

const b = tf.scalar(4);

const c = tf.scalar(8);
// Predict output for input of 2

const result = predict(2);

result.print() // Output: 24
Memory Management – Tensorflow.js uses the GPU on your computer to handle most of the operations which means that typical garbage collection isn’t available. Tensorflow therefore includes the tidy and dispose methods that allow you to dump unused tensors out of memory
// tf.tidy takes a function to tidy up after

const average = tf.tidy(() => {

// tf.tidy will clean up all the GPU memory used by tensors inside

// this function, other than the tensor that is returned.

//

// Even in a short sequence of operations like the one below, a number

// of intermediate tensors get created. So it is a good practice to

// put your math ops in a tidy!

const y = tf.tensor1d([1.0, 2.0, 3.0, 4.0]);

const z = tf.ones([4]);

return y.sub(z).square().mean();

});

average.print() // Output: 3.5
Machine learning in the browser with Tensorflow.js pt.1
In my previous blog post I discussed perceptrons, a very early example of machine learning. As a recap, perceptrons are simple learning algorithms that can solve linearly separable problems.

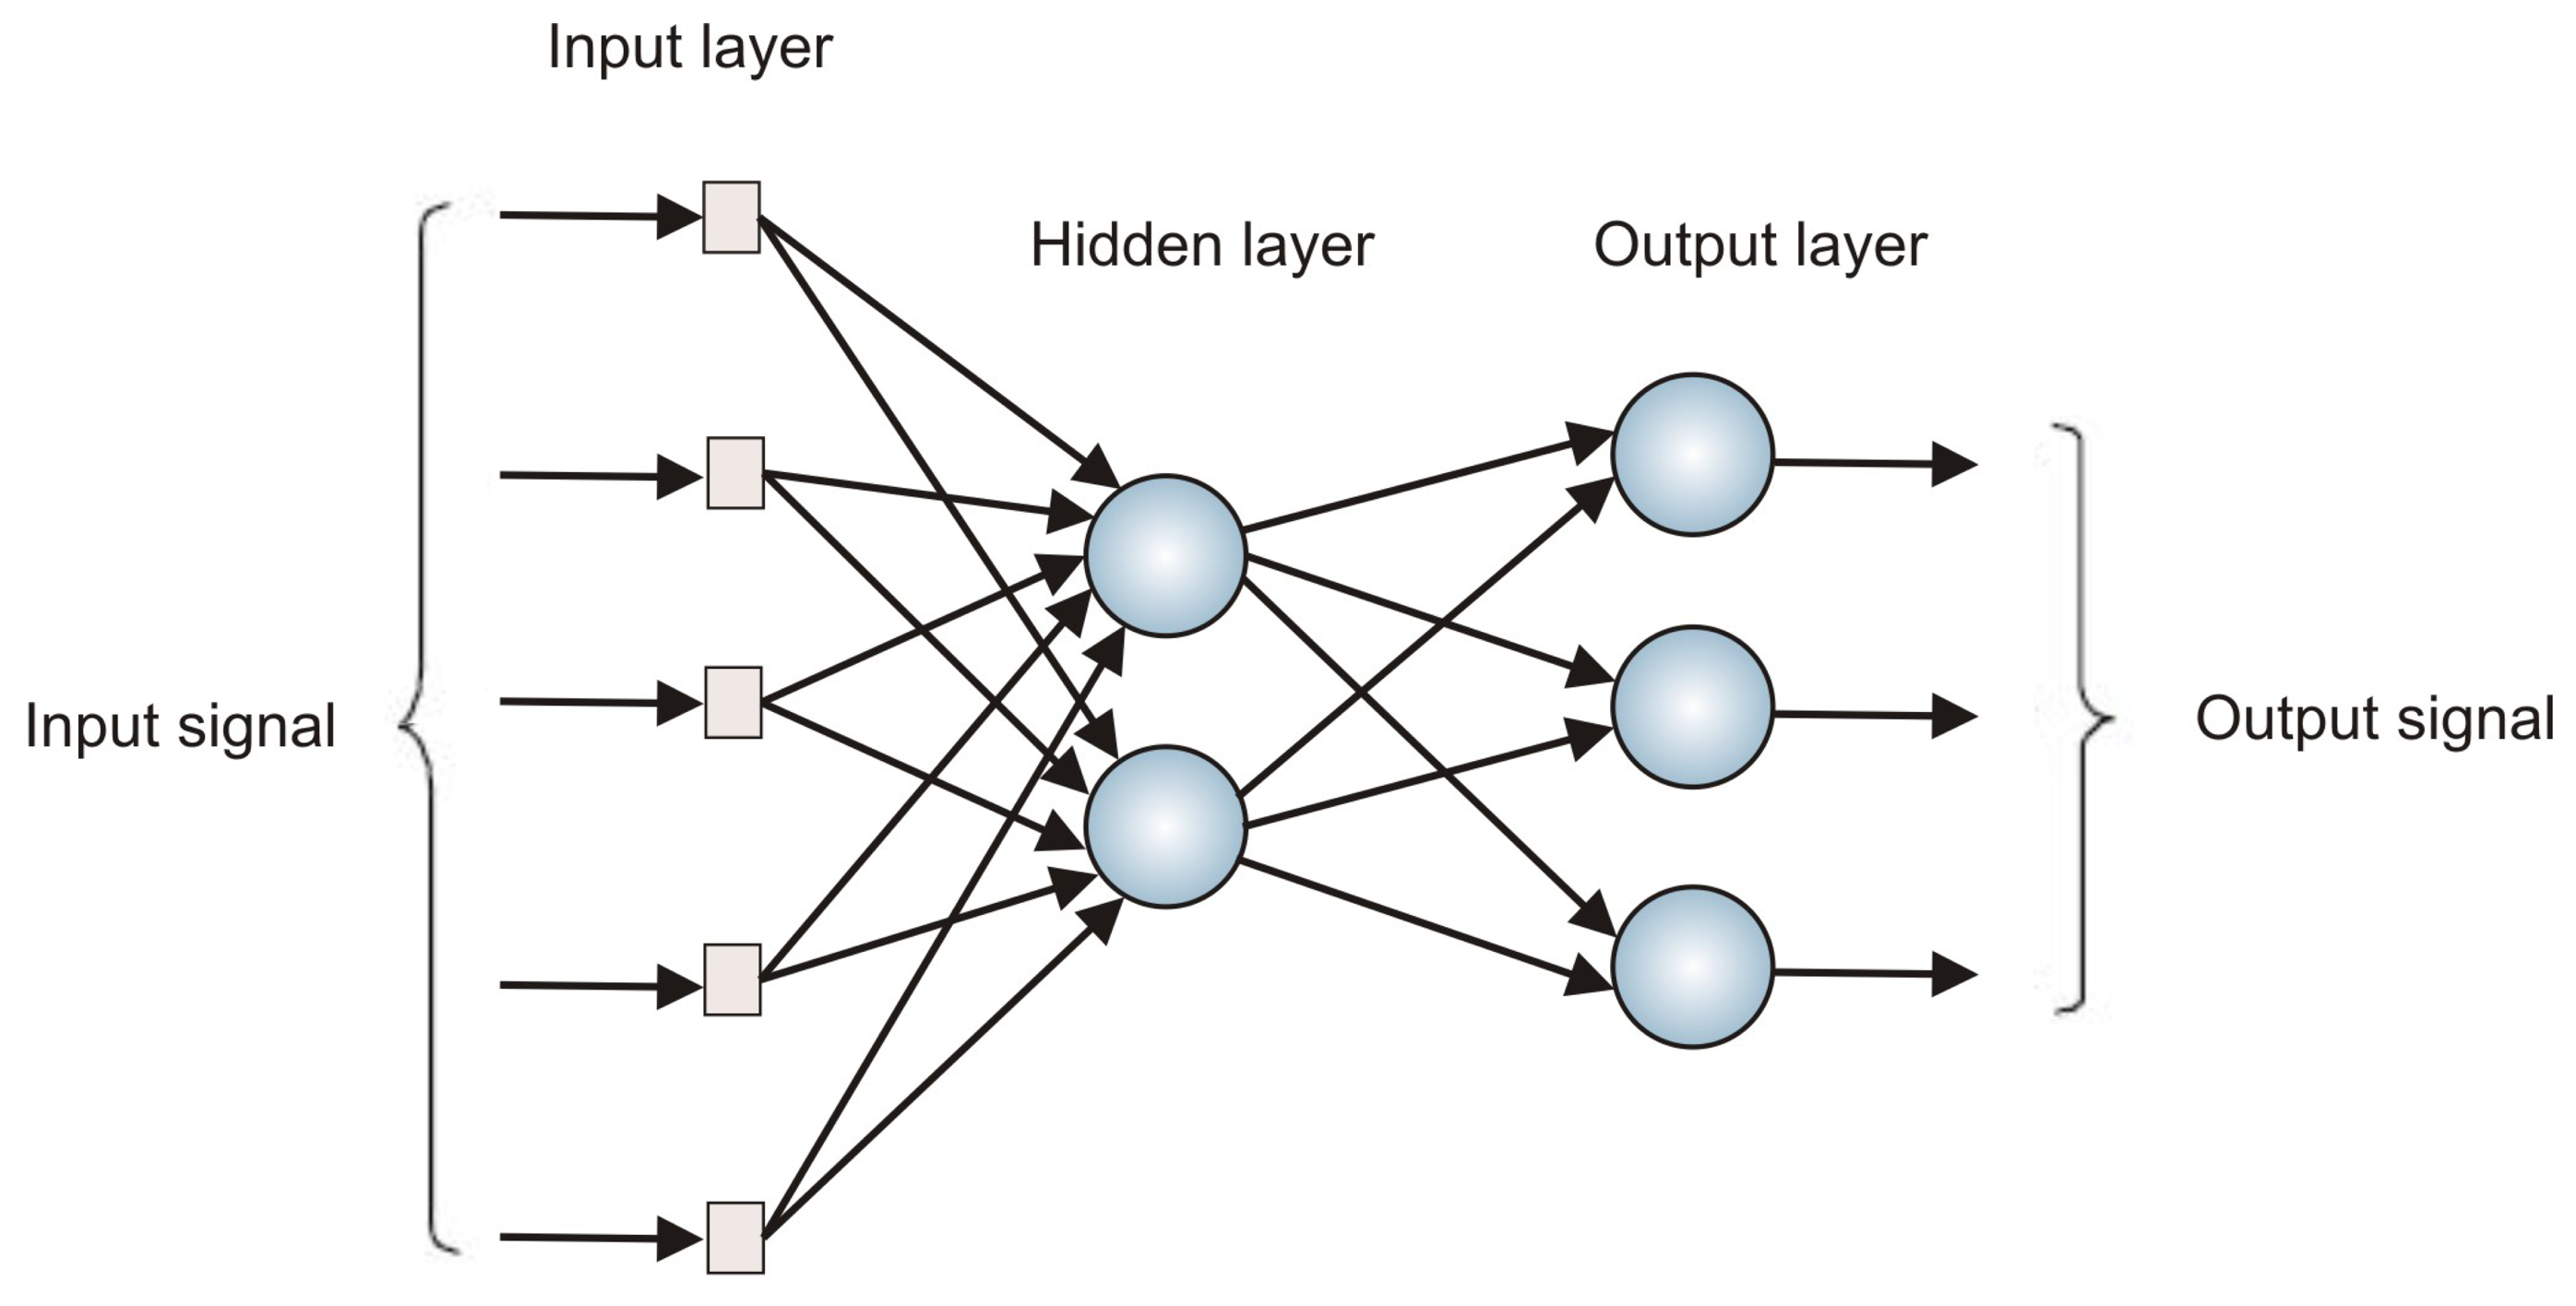
This is cool, but not very useful. As far as I can tell most of the problems a perceptron can solve can be done much more quickly by passing your data through a well considered IF statement (I.e. If coffee mug is in photo then it is a photo of coffee). These days we can see all sorts of applications of machine learning that seem to solve much more complicated problems. Self driving cars are learning what a person looks like, can make assumptions about how they’ll move and can direct a car to respond based on this information. Much of this more advanced machine learning is through multilayer perceptrons, neural nets and other advanced methods.

One of the best way to get started working with these advance machine learning algorithms is through Google’s tensorflow library. This has been available as a python library for some time and was recently updated to include a Javascript library as well. In this post I’m going to cover how to quickly get this running and some basic concepts that you need to understand as you get started. Much of this material is covered in the getting started section on the tensorflow.js website as well.